Creating an alert in the AIVHUB application
There are two ways in which a user can create an alert in the AIVHUB application:-
-
By clicking on the create icon
 located at the bottom most toolbar.
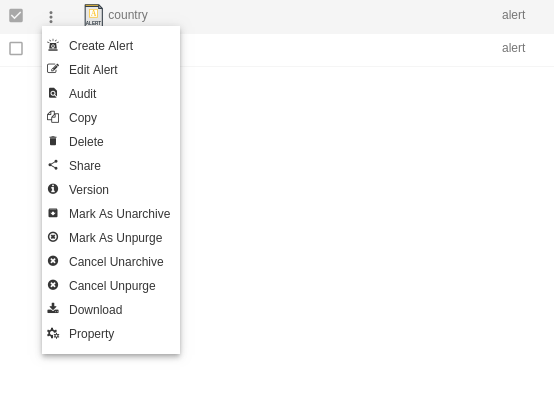
- By right clicking any existing alert and select Create Alert as follows:-

Now perform the following steps in order to create a new alert:-
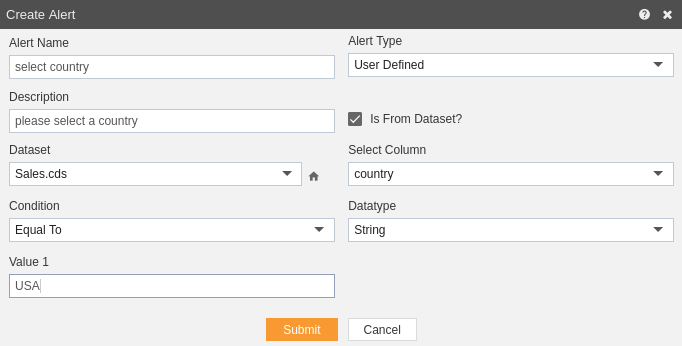
- Click on Create using one of the methods mentioned above which will open the following popup.
- Enter the details as shown in the figure above:-
- Let us understand what is the purpose of each field:-
- Alert Name:- Enter the name you want to give to your alert.(required field)
- Alert Type :- The alert type is user defined by default which enables the user to create an alert.
- Description:- Enter any information you want to provide to other users in Description(optional).
- Dataset:- This is enabled only when the user checks Is it from Dataset? box.This is a dropdown listof available datasets from which we will select Sales.cds for this example (required field).
- Select Column:- This is a dropdown list of all the columns in the dataset from which we will select country as we are creating an alert related to the country.
- Condition:- This specifies the relational operation you want to perform such as Greater than, Less than, etc. Here we we provide Equal to which means alert will check whether value entered by user matches value1 or not.(not a required field)
- Datatype:- List of different datatypes such as string, date, float, date time. Here we will select data type as string.
- Value1:- The value which will be compared with the value entered by user (USA in our case).
- In case of any further help, the user can click on the
 icon to access the AIVHUB help documents.
 - Finally, click on
 button to create a new Annotation Group.
 - If the user is not satisfied and wants to cancel the create request, he can do this by clicking on the cancel button next to submit or by clicking on
 button next to the
  icon.
icon.

In this manner, you can create a new alert in the AIVHUB application.
